Showing posts with label free. Show all posts

Thursday, September 13, 2012

Just In Time for Cooler Weather


What an unusually cool day it is! Usually in Kansas it is either hot or cold, and then a few days in between that are nice.
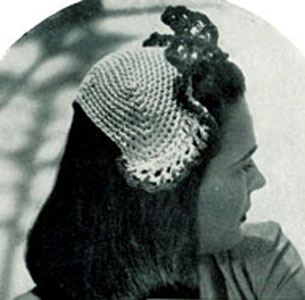
Here is a little1950s hat that i'm making for winter that also will keep my ears toasty without messing my hair!
Pictures to come.

(from freevintagecrochet.com)


Materials Required: AMERICAN THREAD COMPANY The Famous "PURITAN" STAR SPANGLED MERCERIZED CROCHET COTTON, Article 40 or
The Famous "PURITAN" MERCERIZED CROCHET COTTON, Article 40

1 ball Blue Spangle or Blue or color of your choice.
Steel crochet hook No. 7.
2 - 1 inch bone rings.
1st SECTION: Attach thread over a bone ring, ch 2 and work 39 d c over ring, join in 2nd st of ch, ch 3.
2nd Row: Working in back loop of sts only, 1 d c in each of the next 12 sts, ch 3, turn.
3rd Row: Working in both loops of sts, s c in next st, * ch 3, s c in next st, repeat from * across row (12 loops), cut thread.
2nd SECTION: Work 1st 3 rows of 1st section, ch 2 at end of last row, turn (do not cut thread).
4th Row: S c in 1st loop, * ch 3, s c in next loop, repeat from * across row, ch 2, turn (11 ch 3 loops and 1 small loop).
5th Row: S c in 1st loop, * ch 3, s c in next loop, repeat from * 9 times, ch 3, s c in last loop, ch 2, turn.
6th Row: S c in 1st loop, * ch 4, s c in next loop, repeat from * 9 times, ch 4, s c in last loop, ch 2, turn. Repeat 6th row 3 times ending last row with ch 3, turn.
10th Row: S c in 1st loop, * ch 5, s c in next loop, repeat from * 9 times, ch 5, s c in last loop, ch 3, turn. Repeat 10th row 20 times, ch 4 at end of last row.
Next Row: S c in 1st loop, * ch 5, s c in next loop, repeat from * 9 times, ch 5, s c in last loop, ch 4, turn. Repeat last row 11 times ending last row with ch 3.
Next 21 Rows: Same as 10th row ending last row with ch 2.
Next 4 Rows: Same as 6th row.
Next Row: Same as 5th row.
Next Row: With right side of 1st section toward you, s c in 1st loop of 1st section, s c in 1st loop of 2nd section, * ch 1, s c in next loop of 1st section, ch 1, s c in next loop of 2nd section, repeat from * across row, ch 1, sl st in last s c of 1st section, cut thread.
TIE: With right side of work toward you skip 1st 12 free d c of 1st row, working in back loop of sts, attach thread in next d c, ch 1, s c in same space, 1 s c in each of the next 2 d c, turn.
2nd Row: Ch 1, working through both loops of sts, s c in same space, 1 s c in each of the next 2 s c, turn. Repeat last row 51 times, cut thread. Work another tie at opposite end in same manner.

Wednesday, May 16, 2012

Free Vintage Crochet/Knitting Pattern: Easy 1940s Ladies Bolero

Good morning and welcome back to Victory Vintage.  Today i am showcasing  a pattern i am just finishing up.  I fell in love with this on the web (i'm sorry i dont know where i got it) and commenced to making it.

What vintage projects are you working on this week?

So long,
Beth

Monday, May 7, 2012

Favorite Vintage Crochet Pattern: The Ribbed Collar


Here we go!  Starting off the wonderful week with (drum roll, please) one of my infamous Favorite Vintage Crochet Pattern posts!

Came across this one a while back and fell in love.  Its an original pattern from 1935!  Back in those days (Great Depression) women made old dresses new again or dressed up an every day one with handmade collars and cuffs (sewed, crocheted, knitted, etc.).  I love this because my Grandma Mae swore upon the saying "use it up, wear it out, make it do or do without!"  She grew up in eastern Colorado (dust bowl country!) during the 30s and loved anyone who was resourceful and hated anyone who wasn't.  I've always had some of that mentality from her teachings which i part of why i love it.

Another reason why i am so in love with it is that it appears to be VERY similar to the collar on Ginger Rogers dress in Swing Time (1936) when she dances with Fred does it not?


Of course, it is a little different.  But with a few modifications we all could be lookin like that gorgeous blonde!


Here's the pattern!!! Enjoy.


The Ribbed Collar

This free pattern originally published in A Bookful of Crochet, Book No. 52.

Materials: Clark's O.N.T. Mercerized Crochet, size 20, White or Ecru, 6 balls. Milward's steel crochet hook No. 5.
Make a ch 5 inches long. 1st row: Ch 3, d c in 4th ch from hook, d c in each st of foundation ch, turn. 2nd row: Ch 3 (to count as 1 d c), d c in 2nd d c of previous row, always picking up only the front loop throughout work. 1 d c in each d c across ending row with a d c over turn­ing ch-3. Turn. 3rd row: Ch 1, s c in 2nd d c of previous row, s c in each d c across, ending row with s c over turning ch-3. Turn. 4th row: Ch 1, s c in 2nd s c of previous row, s c in each s c across ending row with s c over turning ch-1. Turn. 5th row: Ch 3, d c in 2nd s c of previous row, d c in each s c across, ending with d c over turning ch-1. Turn. Repeat from beginning of 2nd row to 5th row incl, until work measures 51 inches. Complete work with the 3rd row. Break off. Attach thread to 4th ch of foundation ch, * skip the next 2 d c rows, sl st through each of next 2 s c rows. Repeat from * to end of collar. Fasten off. Make a loop on right side of collar and a button on the left side. Press pleats in place.


From Free Vintage Crochet.com

Wednesday, April 25, 2012

Free Vintage Crochet Pattern: Perky Snood


Here it is!  The cutest, easiest little snood pattern of all time.
Using a yarn color similar to your hair color is more conservative but feel free to use what ever you would like.  Personally, I've had my eye on a yellow, red and orange blend of yarn that i just might have to try.  And remember that you can substitute the 4-ply wool and  size 3 hook for any other kind of yarn or hook as long as your gauge is the same.
Original 1942 pattern from
http://www.knitting-crochet.com/

~Perky Snood
Materials:
2 oz. 4-ply wool.
1 crochet hook, size 3- 1 yd. grosgrain ribbon.
23 inches round elastic.
Gauge:
4 meshes -- 3 inches.

Perky Snood

Ch. 49. First Row--~ long treble crochet (long tr.) in 12th st. from hook, * ch. 4, skip 4 sts. on ch. 1 long tr. in next st.; repeat from *, ending ch. 4, skip 1 st., 1 long tr. in last st. Ch. 9, turn.
Row 2- l long tr. in first long tr. of Row below, * ch. 4, 1 long tr. in next long tr.; repeat from *, ending ch. 4, 1 long tr. in 5th st. of turning ch., ch. 4, 1 long tr. in same st. as last long tr. Ch. 9, turn.

Repeat last Row 6 times (23 meshes). Ch. 9, turn.

Row 9--Skip ch. 4, 1 long tr. in next long tr., * ch. 4, 1 long tr. in next long tr.; repeat from *, ending ch. 4, 1 long tr. in 5th st. of turning ch. (23 meshes). Ch. 9, turn. Repeat last Row 7 times, ending last Row ch. 5 instead of 9.

Row 17--Skip ch. 4, 1 long tr. in next long tr., work even to within 2 meshes of end, ch. 4; yarn over3 times, insert hook in next long tr. and draw up a loop, over, take off 2 loops 3 times in succession, wrap yarn over hook 3 times, insert hook in 5th st. of turning ch. and draw up a loop (6 loops on hook), over, take off 2 loops 3 times in succession, over, take off 3 loops (a decreasing long tr.), ch. 5, turn.

Row 18--Skip ch. 4, : long tr. in next long tr., work 18 meshes, ch. 4, work a decreasing long tr. in last u long tr. Ch. 5, turn.

Decrease 1 mesh each side of each of next 6 rows as in last Row. Ch. l, do not turn.

Border. Sew ends of a 22-inch piece of round elastic together. Working around elastic, work 2 S.C. in each mesh on entire outer edge, join with slip st. to first S.C. Fasten off.

Make a tailored bow of ribbon and sew to front of snood as shown in illustration.
~

This pattern is similar to the one worn by pin up model Miss Amanda Lee and sold on Etsy


Friday, April 20, 2012

Free Vintage Crochet Pattern: 1940s Springtime Blossoms

Here it is!  This bag is made to match the Springtime hat in yesterday's post.  Its cute and so retro!

The only problem i had with this was that you need a bag bottom for, well, the bottom of the bag.  I just used a very small crochet hook with the regular belstraw art (i used smaller hook so stitches would be tighter and sturdier) and just crocheted until i got the size i wanted and then sewed cloth to the inside.  You can do what ever you want or you can to to the Free Vintage Crochet website where they have a bunch a crochet bag patterns or theAntique Crochet Patterns website (where i got this pattern) for more.  Oh yea, and if you're a knitter, be sure to check out Free Vintage Knitting website.

Have fun crocheting!!!

Free Crochet Purse Pattern:
Crochet a Stylish Bag

Springtime Bag - Free Crochet Pattern

REQUIRED MATERIALS
Hiawatha Belastraw Art. 35, 3 Tubes
Hiawatha Leather Bag Bottom No. 6515
Steel Crochet Hooks No. 1 and No. 0
Lining Material, Buckram and Snap Fasteners
Flower Trimming

Gauge: 5 sc = 1"

STEP-BY-STEP INSTRUCTIONS
Springtime Bag - Sides
Using No. 1 hook start work in hole nearest one seam.
Rnd 1: With right side facing, work 2 sc in each hole around. Change to No. 0 hook and work sc even until crocheted section is 6" deep. Sl st in next st. End off.

Springtime Bag - Flap
With No. 0 hook make 5 1/2" chain.
Rnd 1: Sc in 3rd ch from hook and in each ch to end, 5 sc in end ch, do not turn but continuing around, work sc in each st along other side of starting chain, ending with 5 sc in end ch.
Rnd 2: Sc in each st to 5 end sts, place marker along edge just worked to indicate back section of Flap, work 3 sc in next st for back corner, sc in each of next 3 sts, 2 so in next st (front inc.), sc in each st of front section to 5 sts at other end, 2 sc in next st (front, inc.), sc in each of next 3 sts, 3 sc in next st for hack corner.
Rnd 3: Sc in each st to 3 sc of hack corner, sc in next st, 3 sc in next (center) st, inc. 2 sc evenly across front section (not directly over inc. of previous rnd), work to next back corner, sc in next st, 3 sc in next (center) st. Repeat 3rd rnd until Flap measures 8 1/4" across back section. Work 1 rnd even, Sl st in next st. End off.

Springtime Bag - Handle
Make 22" chain.
Rnd 1: Same as 1st rnd of Flap.
Rnd 2: * Sc in each st to 5 end sts, sc in each of next 2 sts, 3 sc in next (center) st. Repeat from * once more. Work 1 more rnd with 3 sc in center st at each end. Sl st in next st. End off.


Finishing for Springtime Bag
Sew back edge of Flap to outside of one long edge of Sides 1/2" below top edge, making sure ends of Flap are directly above corners of leather bottom. Line crocheted portion of bag with double fabric and buckram interlining. Fold in top edges of short ends of Sides (to form gussets). Tack at folds. Sew 2 snap fasteners to curved edge of flap. Line Handle with ribbon and attach as shown. Tack Flower in place.

Thursday, March 29, 2012

1940s Free Crochet Hat Pattern

Hat Pattern No. 1844

NOTE:   For this ADORABLE hat i simply used my favorite color of Red Heart yarn (that i got from Walmart) in place of blue yarn and a size 'I' Boye aluminum crochet hook.  This worked well for my head shape and gauge.  If you dont have or cant find a bone hook then work with different hooks and yarn until you get the size you want.

Pattern taken from Free Vintage Crochet Patterns (a website that i love!)


MATERIALS:
J. & P. COATS KNIT-CRO-SHEEN, 2 balls of Blue Jewel.
J. & P. COATS or CLARK'S O.N.T. PEARL COT­TON, size 5, 1 ball of Spanish Red. Bone Crochet Hook No. 6.
Divide each color into 4 equal parts and use 4 threads throughout.
With Blue ch 21. 1st rnd: Sc in 2nd ch from hook, sc in each ch across, 2 sc in last ch; then, working along opposite side of starting chain, make sc in each ch across. 2nd rnd: (3 sc in next sc, sc in next 19 sc) twice. 3rd, 4th and 5th rnds: (Sc in each sc to center st of 3-sc group, make 3 sc in center sc) twice; sc in each remaining sc. 6th rnd: Sc in each sc to center st of 3-sc group, make 3 sc in center sc, work sc in each sc across decreasing 4 sts in center of piece (center back)—to dec 1 sc, work off 2 sc as 1 sc. Work 3 sc in center st of next 3-sc group, work sc in each sc across, increas­ing 4 sc in center of piece (center front)—to inc, work 2 sc in 1 sc. 7th and 8th rnds: Repeat 3rd rnd. Repeat last 3 rnds (6th, 7th and 8th) once more. Sl st in next sc. Break off.
RUFFLE ... 1st row: With right side facing, attach Blue in the 2nd sc to the right of one end, ch 4, * dc in next sc, ch 1. Repeat from * across to corresponding sc on other end. Ch 4, turn. 2nd row: * Dc in next dc, ch 1. Repeat from * across ending with ch 1, dc in 3rd st of starting chain. Ch 1, turn. 3rd row: Sc in 1st dc, * ch 3, sc in next dc. Repeat from * across ending with ch 3, sc in 3rd st of turning chain. Break off. 4th row: Attach Red in base of 1st sc of 3rd row, ch 1, sc in same place, * 3 sc over next ch-3, sc in base of next sc. Repeat from * across. Break off. Turn edges of Ruffle back and sew to edge of hat.